Image Filtering
“Could you take my picture… Cause I won’t remember.”
Filter
%matplotlib inline
import matplotlib.pyplot as plt
import numpy as np
import skdemo

plt.rcParams['image.cmap'] = 'gray'
plt.rcParams['image.interpolation'] = 'none'
1D Filtering
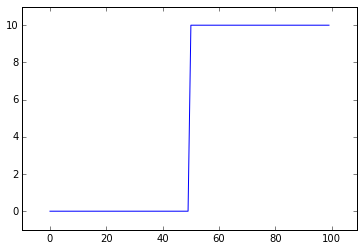
step_signal = np.zeros(100)
step_signal[50:] = 10
plt.plot(step_signal)
plt.margins(0.1)
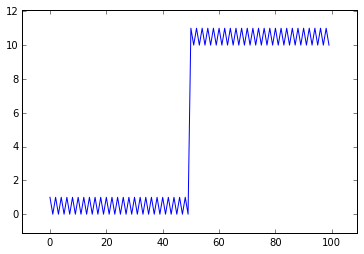
noisy_signal = np.copy(step_signal)
noisy_signal[::2] += 1
plt.plot(noisy_signal)
plt.margins(0.1)
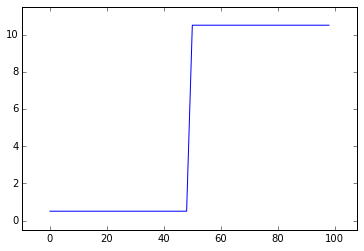
The simplest way to recover something that looks like the original image is to take the average between neighboring pixels:
# Take the mean of neighboring pixels
smooth_signal = (noisy_signal[:-1] + noisy_signal[1:]) / 2.0
plt.plot(smooth_signal)
plt.margins(0.1)
Convolution Kernel
# Neighboring pixels multiplied by 1/2 and summed
mean_kernel = np.array([1, 1]) / 2.0
smooth_signal = np.convolve(noisy_signal, mean_kernel, mode='valid')
plt.plot(smooth_signal)
plt.margins(0.1)

2D Filtering (Images)
Applying a linear filter essentially means:
- Center a kernel on a pixel
- Multiply the pixels under that kernel by the values in the kernel
- Sum all the those results
-
Replace the center pixel with the summed result
import numpy as np
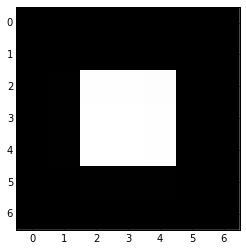
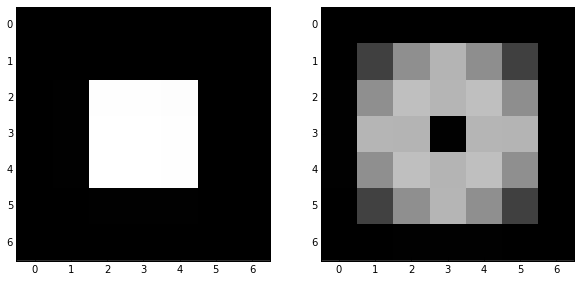
bright_square = np.zeros((7, 7), dtype=float) bright_square[2:5, 2:5] = 1 print(bright_square) plt.imshow(bright_square);
[[ 0. 0. 0. 0. 0. 0. 0.] [ 0. 0. 0. 0. 0. 0. 0.] [ 0. 0. 1. 1. 1. 0. 0.] [ 0. 0. 1. 1. 1. 0. 0.] [ 0. 0. 1. 1. 1. 0. 0.] [ 0. 0. 0. 0. 0. 0. 0.] [ 0. 0. 0. 0. 0. 0. 0.]]
Mean Filter
mean_kernel = 1.0/9.0 * np.ones((3, 3))
print(mean_kernel)

[[ 0.11  0.11  0.11]
 [ 0.11  0.11  0.11]
 [ 0.11  0.11  0.11]]


from scipy.ndimage import convolve

%precision 2

convolve(bright_square, mean_kernel)


array([[ 0.  ,  0.  ,  0.  ,  0.  ,  0.  ,  0.  ,  0.  ],
       [ 0.  ,  0.11,  0.22,  0.33,  0.22,  0.11,  0.  ],
       [ 0.  ,  0.22,  0.44,  0.67,  0.44,  0.22,  0.  ],
       [ 0.  ,  0.33,  0.67,  1.  ,  0.67,  0.33,  0.  ],
       [ 0.  ,  0.22,  0.44,  0.67,  0.44,  0.22,  0.  ],
       [ 0.  ,  0.11,  0.22,  0.33,  0.22,  0.11,  0.  ],
       [ 0.  ,  0.  ,  0.  ,  0.  ,  0.  ,  0.  ,  0.  ]])
This filter is a simple smoothing filter and produces two important results:
- The intensity of the bright pixel decreased.
-
The intensity of the region near the bright pixel increased.
mean_kernel.sum()
1.00
Downsampled image
from skimage import data

image = data.camera()
pixelated = image[::10, ::10]
skdemo.imshow_all(image, pixelated)
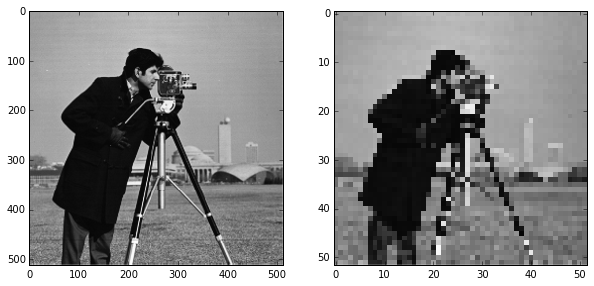
Here we use a step of 10, giving us every tenth column and every tenth row of the original image. You can see the highly pixelated result on the right.
Mean filter on a real image
filtered = convolve(pixelated, mean_kernel)
skdemo.imshow_all(pixelated, filtered)

Comparing the filtered image to the pixelated image, we can see that this filtered result is smoother: Sharp edges (which are just borders between dark and bright pixels) are smoothed because dark pixels reduce the intensity of neighboring pixels and bright pixels do the opposite.
Essential filters
import skimage.filters as filters

sigma = 1
smooth = filters.gaussian_filter(bright_square, sigma)
skdemo.imshow_all(bright_square, smooth)
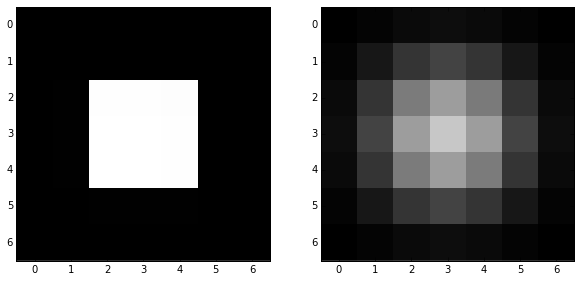
For the Gaussian filter, sigma, the standard deviation, defines the size of the neighborhood.
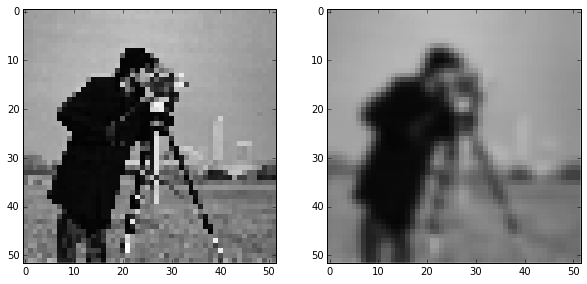
For a real image, we get the following:
from skimage import img_as_float
# The Gaussian filter returns a float image, regardless of input.
# Cast to float so the images have comparable intensity ranges.
pixelated_float = img_as_float(pixelated)
smooth = filters.gaussian_filter(pixelated_float, 1)
skdemo.imshow_all(pixelated_float, smooth)
size = 20
structuring_element = np.ones((3*size, 3*size))
smooth_mean = filters.rank.mean(image, structuring_element)
smooth_gaussian = filters.gaussian_filter(image, size)
titles = ['mean', 'gaussian']
skdemo.imshow_all(smooth_mean, smooth_gaussian, titles=titles)
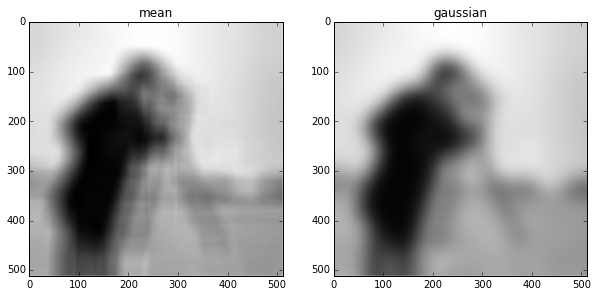
The size of the structuring element used for the mean filter and the size (standard deviation) of the Gaussian filter are tweaked to produce an approximately equal amount of smoothing in the two results.
Basic edge filtering
For images, edges are basically boundaries between light and dark values. The detection of edges can be useful on its own, or it can be used as preliminary step in other algorithms.
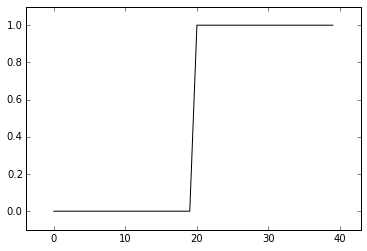
A 1D difference filter
step = np.zeros(40)
step[20:] = 1
plt.plot(step, 'k')
plt.margins(0.1)
To “detect” the edge, we can just take a difference of neighboring values. Here, we’ll use convolution or cross-correlation to do just that:
edge = np.convolve(step, np.array([1, -1]), mode='valid')
plt.plot(step, 'k:', edge, 'r')
plt.margins(0.1)
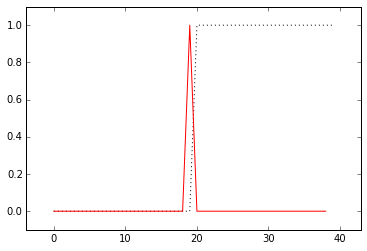
Whenever neighboring values are equal, the filter response is 0. Right at the boundary of a step, we’re subtracting a large value from a small value and and get a spike in the response. This spike “identifies” our edge.
Difference filters in 2D
This is exactly like the convolution filter we used in 1D, but using slicing operations instead of a filtering kernel. We’re avoiding convolution here only because you’ll be developing the filtering kernel in an exercise soon enough.
vertical_gradient = pixelated[1:, :] - pixelated[:-1, :]
horizontal_gradient = pixelated[:, 1:] - pixelated[:, :-1]
skdemo.imshow_all(pixelated, vertical_gradient, horizontal_gradient)
Note: uint operation problem
import skimage

pixelated = skimage.img_as_float(pixelated)
vertical_gradient = pixelated[1:, :] - pixelated[:-1, :]
horizontal_gradient = pixelated[:, 1:] - pixelated[:, :-1]
skdemo.imshow_all(pixelated, vertical_gradient, horizontal_gradient)
vertical_gradient = bright_square[1:, :] - bright_square[:-1, :]
horizontal_gradient = bright_square[:, 1:] - bright_square[:, :-1]
skdemo.imshow_all(bright_square, vertical_gradient, horizontal_gradient)
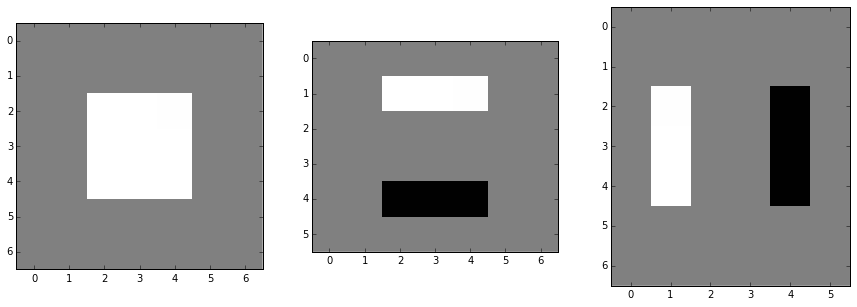
print(bright_square.shape, horizontal_gradient.shape)

(7, 7) (7, 6)
Note here that:
- The shape of the image isn’t preserved
- The operation skews edges to one corner of the image.
This difference operation gives the gradient in-between pixels, but we typically want the gradient at the same pixels as the original image.
Exercise:
Create a simple difference filter to find the horizontal or vertical edges of an image. Try to ensure that the filtering operation doesn’t shift the edge position preferentially. (Don’t use slicing to produce the difference image; use convolution.)
# Replace the kernels below with your difference filter
# `ones` is used just for demonstration and your kernel
# should be larger than (1, 1)
horizontal_edge_kernel = np.ones((1, 1))
vertical_edge_kernel = np.ones((1, 1))

# As discussed earlier, you may want to replace pixelated
# with a different image.
image = pixelated
# NOTE: A **vertical** gradient has a strong response at
# **horizontal** edges and vice versa.
vertical_gradient = convolve(image, horizontal_edge_kernel)
horizontal_gradient = convolve(image, vertical_edge_kernel)
skdemo.imshow_all(horizontal_gradient, vertical_gradient)

Possible Answer:
NOTE: A vertical gradient has a strong response at horizontal edges and vice versa.
# Replace the kernels below with your difference filter
# `ones` is used just for demonstration and your kernel
# should be larger than (1, 1)
horizontal_edge_kernel = np.array([[1], [-1]])   # column vector
vertical_edge_kernel = np.array([[1, -1]])       # row vector

# As discussed earlier, you may want to replace pixelated
# with a different image.
image = pixelated
# NOTE: A **vertical** gradient has a strong response at
# **horizontal** edges and vice versa.
vertical_gradient = convolve(image, horizontal_edge_kernel)
horizontal_gradient = convolve(image, vertical_edge_kernel)
skdemo.imshow_all(horizontal_gradient, vertical_gradient)
Note: The above is skewed to one direction. Thus, a way to prevent skewing is:
# Replace the kernels below with your difference filter
# `ones` is used just for demonstration and your kernel
# should be larger than (1, 1)
horizontal_edge_kernel = (1/np.sqrt(3))*np.array([[1], [1], [-1]])   # column vector
vertical_edge_kernel = (1/np.sqrt(3))*np.array([[1, 1, -1]])       # row vector

# As discussed earlier, you may want to replace pixelated
# with a different image.
image = pixelated
# NOTE: A **vertical** gradient has a strong response at
# **horizontal** edges and vice versa.
vertical_gradient = convolve(image, horizontal_edge_kernel)
horizontal_gradient = convolve(image, vertical_edge_kernel)
skdemo.imshow_all(horizontal_gradient, vertical_gradient)

import skimage

pixelated = skimage.img_as_float(pixelated)
image = pixelated

horizontal_edge_kernel = 1.0/9.0 * np.array([[-1, -1, -1], [1, 1, 1], [-1, -1, -1]])
vertical_edge_kernel = 1.0/9.0 * np.array([[-1, -1, -1], [1, 1, 1], [-1, -1, -1]])

vertical_gradient = convolve(image, horizontal_edge_kernel)
horizontal_gradient = convolve(image, vertical_edge_kernel)
skdemo.imshow_all(horizontal_gradient, vertical_gradient)
import skimage

pixelated = skimage.img_as_float(pixelated)
image = pixelated

horizontal_edge_kernel = 1.0/9.0 * np.array([[-1, 1, -1], [-1, 1, -1], [-1, 1, -1]])
vertical_edge_kernel = 1.0/9.0 * np.array([[-1, -1, -1], [1, 1, 1], [-1, -1, -1]])

vertical_gradient = convolve(image, horizontal_edge_kernel)
horizontal_gradient = convolve(image, vertical_edge_kernel)
skdemo.imshow_all(horizontal_gradient, vertical_gradient)
import skimage
pixelated = skimage.img_as_float(pixelated)
image = pixelated
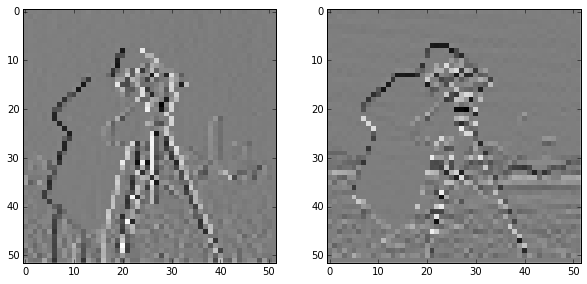
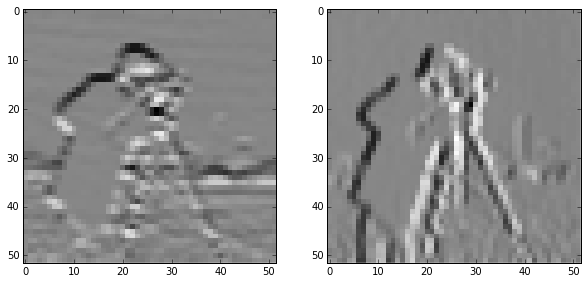
horizontal_edge_kernel = np.array([[1, 0, -1], [2, 0, -2], [1, 0, -1]])
vertical_edge_kernel = np.array([[1, 2, 1], [0, 0, 0], [-1, -2, -1]])
vertical_gradient = convolve(image, horizontal_edge_kernel)
horizontal_gradient = convolve(image, vertical_edge_kernel)
skdemo.imshow_all(horizontal_gradient, vertical_gradient)
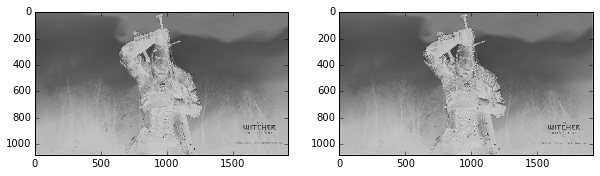
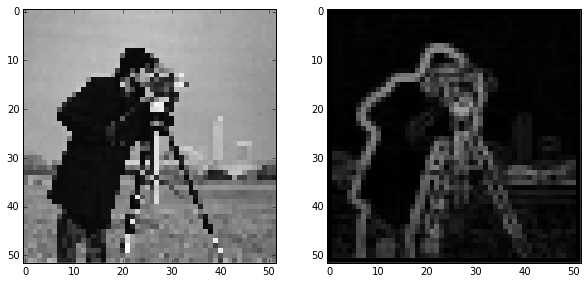
from skimage.color import rgb2gray
from skimage import io
src = io.imread('/home/cobalt/Pictures/geralt.jpg')
gray_image = img_as_float(rgb2gray(src))
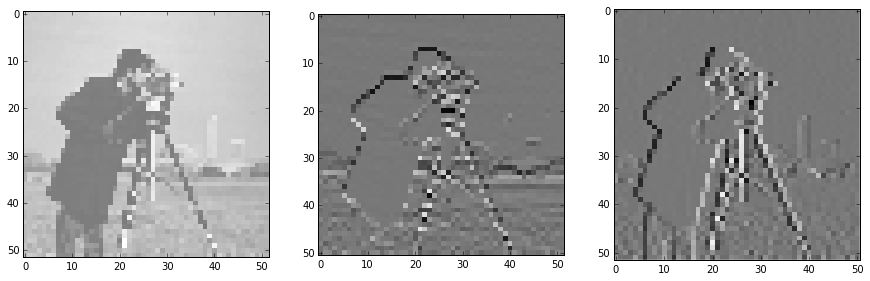
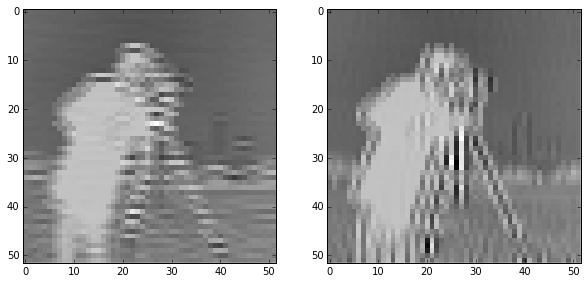
horizontal_edge_kernel = 1.0/9.0 * np.array([[-1, 1, -1], [-1, 1, -1], [-1, 1, -1]])
vertical_edge_kernel = 1.0/9.0 * np.array([[-1, -1, -1], [1, 1, 1], [-1, -1, -1]])
vertical_gradient = convolve(gray_image, horizontal_edge_kernel)
horizontal_gradient = convolve(gray_image, vertical_edge_kernel)
skdemo.imshow_all(horizontal_gradient, vertical_gradient)
Sobel edge filter
skdemo.imshow_all(bright_square, filters.sobel(bright_square))
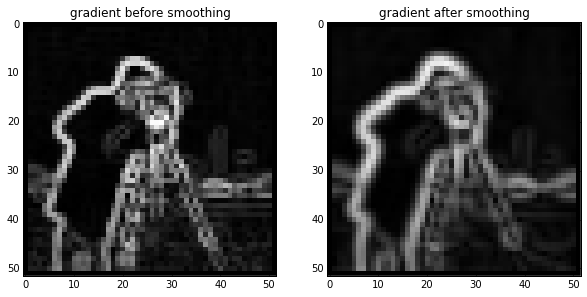
pixelated_gradient = filters.sobel(pixelated)
skdemo.imshow_all(pixelated, pixelated_gradient)
gradient = filters.sobel(smooth)
titles = ['gradient before smoothing', 'gradient after smoothing']
# Scale smoothed gradient up so they're of comparable brightness.
skdemo.imshow_all(pixelated_gradient, gradient*1.8, titles=titles)
# Kernel copied from `vsobel` docstring.
# Vertical edge-reponse is the *horizontal* gradient.
dx_kernel = np.array([
[1, 0, -1],
[2, 0, -2],
[1, 0, -1],
])
# Rotate array by 90 degrees to get y-gradient kernel
dy_kernel = np.rot90(dx_kernel)
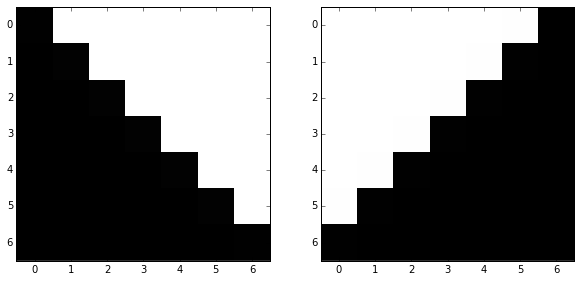
image_45 = np.tril(-np.ones([7, 7]))
image_135 = np.rot90(image_45)
skdemo.imshow_all(image_45, image_135)
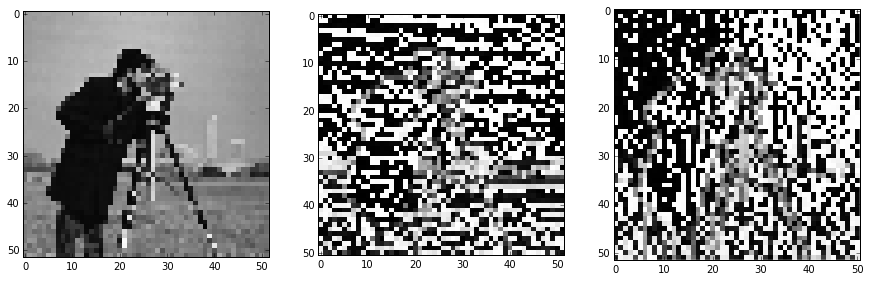
Denoising filters
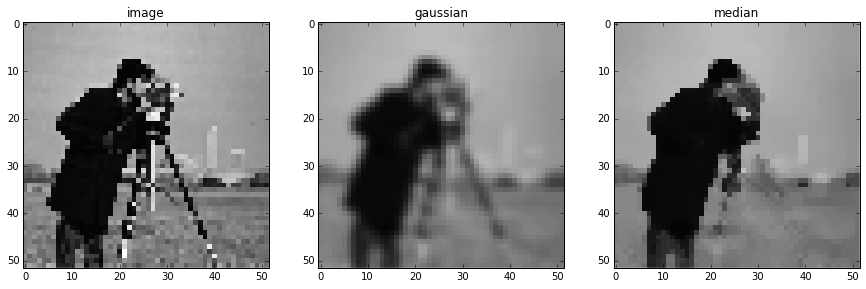
Median Filter
from skimage.morphology import disk
selem = disk(2) # "selem" is often the name used for "structuring element"
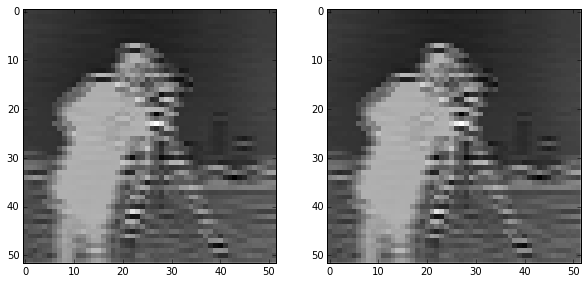
median = filters.rank.median(pixelated, selem)
titles = ['image', 'gaussian', 'median']
skdemo.imshow_all(pixelated, smooth, median, titles=titles)
/usr/local/lib/python3.4/site-packages/skimage/util/dtype.py:111: UserWarning: Possible precision loss when converting from float64 to uint8
"%s to %s" % (dtypeobj_in, dtypeobj))
selem = disk(10)
coins = data.coins()
mean_coin = filters.rank.mean(coins, selem)
median_coin = filters.rank.median(coins, selem)
titles = ['image', 'mean', 'median']
skdemo.imshow_all(coins, mean_coin, median_coin, titles=titles)
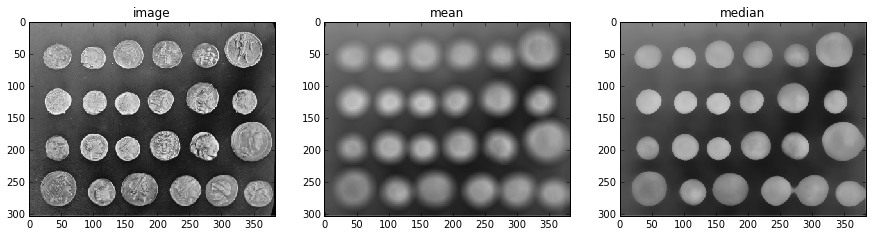
Notice how the edges of coins are preserved after using the median filter.
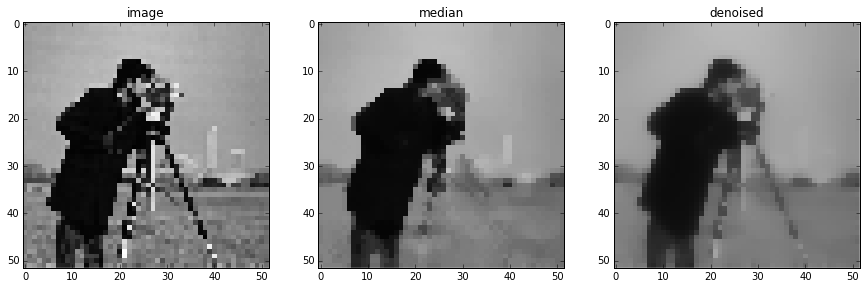
from skimage.restoration import denoise_tv_bregman
denoised = denoise_tv_bregman(image, 4)
titles = ['image', 'median', 'denoised']
skdemo.imshow_all(image, median, denoised, titles=titles)